Wednesday, December 12, 2012

My New Maggie

If you've been with me awhile, you know how I love my Maggies, Magnolia Tilda, that is.  Tilda got me started with stamping.  That cute little face is adorable, and they were always colored so pretty.  I decided I wanted to color some of my own.  Now I have a nice collection of Tilda stamps.  It would be hard to pick one to part with.

This newest Maggie is called "Tilda with Corn" from the Turning Leaves Collection for fall 2012.  I colored her in Promarkers because I just got the Limited Edition Autumn of 2012 colors.  Her hair is done in Copics -- E25, E31, E34.  Her skin colors are Coral, Pale Pink, and Blush.  Isn't she just the cutest!  Makes me want to pinch her little cheeks. 
 

I used a white Sharpie paint pen for highlighting.  One good thing about the Sharpie white paint pen is, if you put too much, which I'm more likely to do than not, it dries, and you can scratch it off and do it over with no muss, no fuss.  My kind of pen.

I'll be working on some step-by-step pics on techniques and combos.  If there's something you would like to see, just let me know, and we'll work on it together.  Someone mentioned a problem with blue/black hair combos, so that will most likely be the first up.

Now I have a question.  Is there a blending system with Promarkers like the Copic system, you know, with the numbers and letters on the caps?  I'll post your answer here so we can all learn about it together.

Thanks in advance, and, as always -- 
Thanks for stopping by!

Tuesday, December 11, 2012

Blending and Shading

I've been wanting to share this little exercise in blending and shading with sketch pencils.  Unfortunately, the urge struck me when I had only 5B sketch pencils on hand.  With blending and shading, it is still possible to do really well with just one lead size.  It's just a matter of more pressure here, less pressure there, and I find this a good way to practice blending and shading.


This image is by Sureya on Deviant Art.  I love coloring Sureya's images.  They are interesting and always have lots of swirls and curls.  Perfect for practicing blending and shading combos.  This is Andria (or li dong hua...).  

#1
 
#2
#3
 #4
While this exercise is very relaxing, it takes a lot of time.  Knowing when to stop depends solely on you.  Try this exercise, though.  You'd be really surprised what you learn about colors by using just black and white.  Then why not stop by Sureya's and see what fun image you'd like to color.   http://sureya.deviantart.com/ 

As always --

Thanks for stopping by!

Sunday, December 9, 2012

A Little Something for Robert

Poor RJ is dealing with yet another death in his family.  I've gotten so used to posting for the challenges that I decided to go ahead and post this last one.   Over at Scraps of Color, our last Robert Jackson Digi challenge was featuring some exceptional women called "Black Girls Rock."  I completed three of them, Janelle Monea, Dionne Warwick, and now this one is Kerry Washington.  I colored her in Promarkers. 


One of the best features of Promarkers is showing on this coloring.  I still haven't learned when enough is enough.  As I was putting a second layer of color on her face, I decided it was too dark, so I didn't color over the eye area.  I didn't need a second layer of color.  That's what I like about Promarkers.  With each layer of color, you get a deeper darker color, which is why you can often shade and/or blend with the same marker.   As a "fix" I made it look like she's wearing eye shadow instead of considering it a total loss.  LOL

Do you like my fancy frame?  I cut it with my Cricut using the "Francy Frames" cartridge.  I finally learned how to make the frames to fit my 4 x 6 colorings.  This one is still a little off, but it came out so nice I wanted to show it to you guys.  It looks like it's flocked, but it's only black paper on top of Martha Stewart silver cardstock.

Hope your Sunday has been a good one.  As always...

Thanks for stopping by.

Thursday, December 6, 2012

A Cuddlebug Cutie! and New Combo for Blonde

Wow, the boards are really slow.  I guess you guys are all busy with activities of the season, so we'll give you a pass for the next couple weeks. LOL

This little freebie cutie is one of the "Cuddlebug Cuties."  I love, love, love them. They are so much fun to color.  There's usually lots of hair and a face large enough to use for new techniques.  Her name is Maggie, and she's done in all Copics.


I have been looking for a really blond blond, not too much brown, not too much red, not too much yellow.  This combination came from Magnolia Ink magazine, the magazine for those adorable Maggies.  This beautiful blond combo consists of Copic markers E50, E53, and E55.


Of course, there are lots of other things I like about this image.  I like to see little girls with their cute denim skirt, and I like the blending and shading on it, same with her T-shirt.
  
Now, the eyes can be better.  They are much too blue.  Either I didn't do it or it doesn't show the shading in her eye color.  There should be some darker shading up close to the top eyelid.  That's why I love these little cuties.  The things you'd like to work with are large enough to work with and really see what you're doing.  I look for images with lots of hair, skin, eyes, and a face large enough to practice blending, shading, and blushing.  


Please feel free to share your combos here.  I will try them and share here.  Variety is the spice of life.  But sometimes we like having that go-to combo that just works for us.  So we newbies are always looking for something that is tried and true when we need quick

I hope someone found something helpful here.  Why not stop by Cuddlebug Cuties, see what they've got that you like, and leave them a comment.


As always -- 
Thanks for stopping by!


Friday, November 23, 2012

Robert Jackson Digi Challenge - 2nd Entry

So short and sweet -- hopefully helpful -- didn't think I would get this one done, but I did.   It's Dionne Warwick.  I used Promarkers and Copics.  After coloring her face and hair, I didn't want to practice on a fur technique (which I think is what she usually wears) and take the chance of messing it up, so I used glitter on the collar. 

One other thing...I have been buying the fine tips for all of my Promarkers. 


Can you see how close you can get in those tiny spots!  There's a little overflow, but I pushed it back with the blender pen.  You can see on the top one that I was able to keep the four earrings looking like four earrings rather than a blob.  Of course you may not have that problem. 

The fine tips are not very expensive.  These are metal tips,  not nibs.  You get three in a pack for about less about $2.38.  I've been buying 10 a month until I get them all done.  I love using them, and you only have to pop them off when you need a regular tip, and pop them right back on, no need for nibs and tweezers.

Thanks for stopping by!

Saturday, November 17, 2012

Robert Jackson Digi Challenge - Black Girls Rock

My latest challenge entry.  I happened to catch this program called "Black Girls Rock" about a week or so ago.  Some of the ladies featured I recognized, some not.  It was very interesting and inspiring to see the accomplishments of these women.   I was particularly impressed by Janelle Monae so I chose her image to color.  I used Promarkers and Copics.


There are several more of these digis available on Robert Jackson's website.  If you want to participate in the challenge you can head over to Scraps of Color for details.
http://scrapsofcolor.ning.com/group/robert-jackson-digi-group/forum/topics/rock-it-don-t-stop-it

If you'd like to get the digis for coloring or because black history month  (February) will be here before you know it, go here:
http://www.fineartsbyrobertjackson.com/new-digital-arrivals.html

Thanks for stopping by!

Friday, November 16, 2012

Framing and Chilling

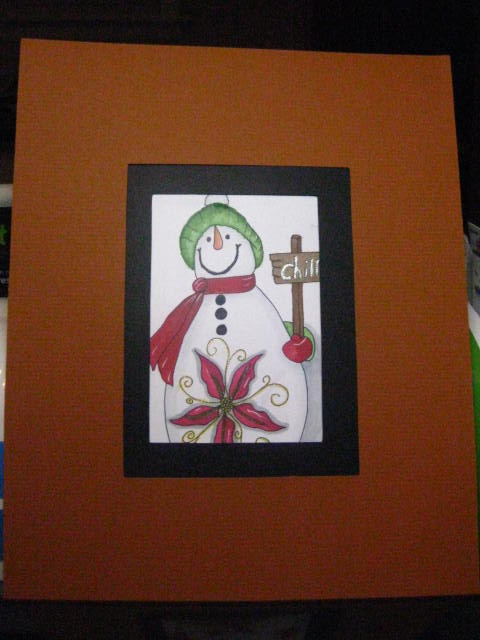
I've been trying to get my Cricut to work with me and get some Fancy Frames cut out.  The ones that cut are way too big around and in the opening.  So I've got to fiddle around to get them the way I'd like them to be.  I only want the entire frame to be 5x7 including any decorating or trimming.  So far this one is the best, but it's way too big for my purpose, 8x10.  It's a nice frame and mat, so I'll be keeping it and using it.  There's literally no instructions with this cartridge, just choose the height of your picture.  Most of my pics are 4x6.  With these instructions, I get an 8x10 frame and a 4x6 opening.  I'm trying real dial size and relative dial size.  If any of you have any tips on using the Fancy Frames cartridge, please share.  I'm doing trial and error now.  TIA


This is my entry for this week's Creative Freebie Challenge over at Outlawz. 


As always --
Thanks for stopping by!