Friday, January 18, 2013

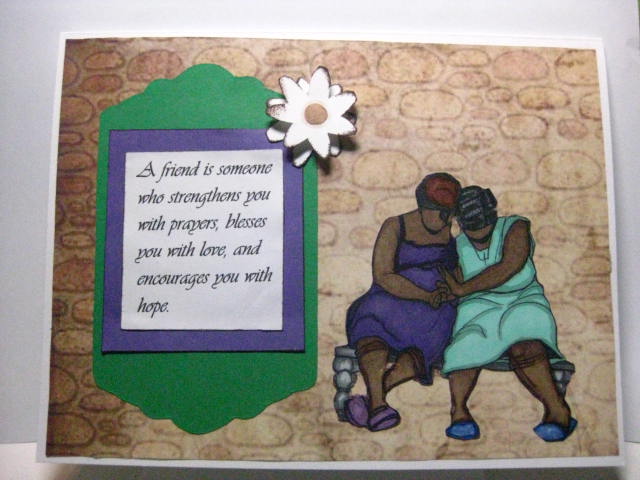
New Card for Challenge

This card is for the Robert Jackson Digi image Challenge Straight From the Heart.
RJ 2013 #2

Tuesday, January 15, 2013

More Ugly and A Bit About Paper

Okay, so this started when I accidentally printed out one of my Sassy Studio Designs images on a bright white, 97-pound premium color laser paper.  I set out to color with my Promarkers to see how the ink would work with this paper as it's not as thin as regular copy paper. 

So far so good.  Dress and arms look really good. 
 
On to face and hair.  Now, it looks good from here --
 
-- but -- Yikes!  Hair color bled onto face and eye whites not white.
 
Okay, no problem.  Use the blender pen to push color back into her hair and white pen to white up the whites of her eyes.  Looks good, but my paper is a wrinkling.  I know why it's wrinkling, but I'll see if you guess it before I tell you. 
 
Used a little eye liner.   That left one looks wacky.  I give up. 
 
Why did this happen?   This is the back side of the coloring. Wow! That's a lot of ink! I could tell right off that I was going to use a lot of ink because even though I tried to color lightly, it took several go overs to lay the color. Normally I would have stopped and tossed early on, but thought it would make a good post on papers.
 
This weight of paper is used for brochures.  It's heavier and shinier than regular copy paper, so it seems like it may be a good paper for coloring with markers, especially if you're going to be cutting your image out.  For small images, maybe.  But for a large image, you'll use (waste) too much ink.  Honestly, if I were using my Copic markers, I would have done an ink check and would never have used them with this paper.
 
This paper literally began to fuzz up when you work in one area too long.  I colored as lightly as I could.  I knew the paper couldn't soak up that much ink and not tear.  I used the extra fine nibs sparingly as it would tend to weaken the paper, making it prone to fuzzing. 
 
What paper you use is sooo important.  It can make or break your project and increase your frustration using markers.   Markers are best when used on paper made specifically for alcohol inks.  Some of them don't bleed to the other side at all.   None.  Nada. Nil.
 
Girlfriend's dress is kicking. 
 So off with her head.  I'll give her a new one and use this image in a project in the future. 
 
As always --
Thanks for stopping by!

Friday, January 11, 2013

Some Cards for You

I've got cards for you today.   Both of these cards were made for challenges -- Robert Jackson Digi Challenge at  Scraps of Color and Creative Freebie Challenge at The Outlawz Challenges.   Since I gave up making them, they look a whole lot better. LOL


RJ 2013#1
 
CFC123012
Hope you like them and they encourage you to keep coloring.
As always...
Thanks for stopping by!


Saturday, January 5, 2013

Playing with Markers

Hey, you guys,
I have something special for you.  This little lady is one of Saturated Canary's images.  Cutie, huh?  What's special about her, besides some really good coloring, is that she is not at all what I intended her to be but soooo pretty. The reason I can put this beautiful image before you is not something that you can read in a book, not something you can learn from a video, not even something you could learn in a class. It's because I play with my markers.

My little crafting buddy says she doesn't think we use enough greens. So I pulled greens. Things didn't quite go well almost from the start. I didn't want to scrap it, so I just played with it. There is ink on top of ink, colors on top of colors, blending, and all sorts of oopsies made to look not like an oopsie. The only way I could have pulled it off is because while I play with my markers, I learn things about the ink, paper, drying time, layering, what a blender can and cannot do...


What I did with this image would probably make some folks cringe. What I did to it is not something I could tell you how to do because the "techniques" evolved as I went along. What started as a practice session could now be used on a project.


You have to get your markers out and play with them.  If you wait until you want to color something for a project, there are so many things you will never learn, and it's too much pressure.  You have to play with the markers.  That is how you develop your own style.  That is how you learn to color like the "pros".   Same goes for colored pencils, crayons, chalks, watercolors, and paints. 

I've often heard on the videos "This is how I do it.  I'm not sure if it's some sort of technique or whether it's right or wrong.  It's what works for me.  So this is how I do it."  Isn't that where we really want to be?   Having our own style and getting terrific results.  Even Suzanne Dean says she's not trying to create copies of herself.  She wants you to find your own style.  There's only so much you can be taught.  The rest comes from actually doing what it is you're trying to learn.  Hands on.

I try to color something every day.  Most of what I color will not end up on a project, but the valuable information I learn while playing makes my next project better and much more my own.

As always,
Thanks for stopping by!

Tuesday, January 1, 2013

BAD PAPER! BAD!

Thanks so much for your comments on my last post.  It reminded me of some of my first posts here.  Even though I'm a person who sees a glass as half full, I also believe that if it happens to somebody else it can happen to me.  I don't want to go to the school of hard knocks if I can avoid it, but I love reading the stories of those who have gone.

Because of my profession in the legal field, I've seen a lot of things that go on behind the scenes.  I know that a lot of what goes on before it becomes "known about" never gets disclosed.  Those disclosures could help prevent errors and/or increase a bottom line.  Sometimes knowing what you don't know can be a powerful learning experience.  If seeing my oopsies encourages or inspires someone to pick up those markers and get to coloring, have at them.

Here is my latest oopsie, just this past weekend.  When I first started coloring with Copic markers, there was so much emphasis on the paper you choose.  I'm sure you've heard about the importance of paper and know there are several on the market.  What does the paper have to do with the functioning of the markers?  When you've spent money on these markers, you don't think about paper.  You just want the markers to work, and as much as you paid for them, gosh, darn, they should work on any paper, if not color by themselves! LOL

I've been coloring on paper made for markers.  I use both Copics and Promarkers with very few problems with bleeding and oversaturation.  Somehow a swatch paper that I cut from paper that was intended to use in the Cricut Imagine ended up in my stash.   The image was printed, and my colors were picked.  As I began to color, what I was seeing right before my eyes gave me flashbacks and palpitations, and I swear I could hear the music from "Psycho" in my head.


What an awful mess.  It took me awhile before I realized it was the paper.  I thought about the ink.  I thought about the room temperature.  Did I leave them sitting in the sunlight.  None of those had ever been a factor before.  I only realized it was the paper when I just put it aside and started coloring something else with no problems.  Now just to find out how it made its way into my stash of swatch paper.

I have to apologize to Khrista of Saturated Canary.  This is my first post using one of her images.  If you've been researching coloring with markers, I'm sure you've heard of Saturated Canary.  Her images are fabulous.  So much fun to color.  I have another one for my next post.   You can find Khrista here and an occasional freebie here.  http://saturatedcanary.blogspot.com/  

One of the things I enjoy on YouTube is when the accomplished artists show their journals or swatch books from their early years and comment on their progress.  Both Promarkers and Copic sell papers specifically designed for their markers.  That's a good place to start.  I promise you'll see immediate improvement.

And, remember, even Venus and Serena don't hit every ball or win every match.   LOL
As always,
Thanks for stopping by!

Wednesday, December 26, 2012

The Good, The Bad, and ... just a downright mess!


Why am I showing you this well-colored, headless image? Because I promised to show you the good, the bad, and the oopsies. LOL

The coloring on this image is to die for.  The image is one from Sassy Designs Studio.  http://buysassystudiodesigns.blogspot.com/  That dress, the shading, the blending -- almost perfect.  I was ecstatic. Yes!  I was going to present her here to encourage all of us to just keep coloring and practicing and eventually we will see fantastic results.

If that was the end of the story, this post would have another title.  I have often mentioned how do you know when to leave your coloring alone.  I thought 'this is how I want all my images to turn out.'  Of course, being the perfectionist that I am, there was just a tiny little spot on the corner of her mouth that was -- maybe I could use my multiliner and just smooth that little spot into the rest of -- uh-oh.  Oh, no.  Major oopsie!  That's okay, I'll use my white Sharpie pen, cover that up, redraw, and color.  It will hardly be noticed.  Uh-oh.  Didn't need that much.
 
   
That's okay.  I'll let it dry, scrape it off, and then redraw, recolor -- uh-oh --
 

Now look at what I did!

 
I know.   Just a downright mess.  Once upon a time I would have tossed this or cut the head off and tried to paste on another and would have been absolutely frustrated with this whole marker thing -- but I couldn't bring myself to toss it.


She's beautiful.  And I think you'll agree this really is some of my best coloring.  Even with what some would consider a defect, she is absolutely physically beautiful.  She must also be beautiful inside because girlfriend's got an attitude.  Heyyyyyyyyy!!!!  Sassy, sassy.

We can only excel with practice.  Stuff like this happens along the way.  Major oopsies, some downright messes.  Learn from them and move on. Keep practicing.  And learn to leave well enough alone.  Sometimes we have to look past the imperfections and focus on the beauty that's reflected.    
 
As always --
Thanks for stopping by!

Wednesday, December 19, 2012

Practicing Highlighting Hair

One of the most daunting tasks of coloring and shading is coloring hair and skin.  You need to practice, practice, and practice some more.

This is my entry for the Outlawz Freebie Challenge.  It's Anne Fenton's image.  Anne has contributed many of her images for this challenge group.  A few weeks ago, I did another of her images where I colored and highlighted hair.  Well, I was so happy with it!   It took forever, and looked really good.

So what would I say about it now?  Uh....needs a lot of improvement.  Good thing is if you keep practicing you can get better. This one didn't take quite as long to color the hair, but I'm happier with it, the way it looks and the way it photographs.  I used Promarkers.  Forgot to separate my colors when I listed them, so I only know for sure I used tan for the highlights and Copics - E000, E00, E01, E20.
 1-White highlights 
2-Colored highlights - Tan 
3-Close up of colored highlights 
4-Other side with white hightlights 
5-Full colored hightlights - Tan 
6-Close up 
7-Finished
 
Hopefully somebody found this helpful.  After working with markers for over a year now, my advice is still the same.  You can read books and look at videos, then you have to practice.  Even if something turns out horribly, you have to look at it as a lesson, learn from it -- what you did, what you could have done, what you didn't do...that's the only way.  Pros only become pros by practicing.  No way to avoid it.  It's practice, practice, and then practice some more. 
Thanks for stopping by!